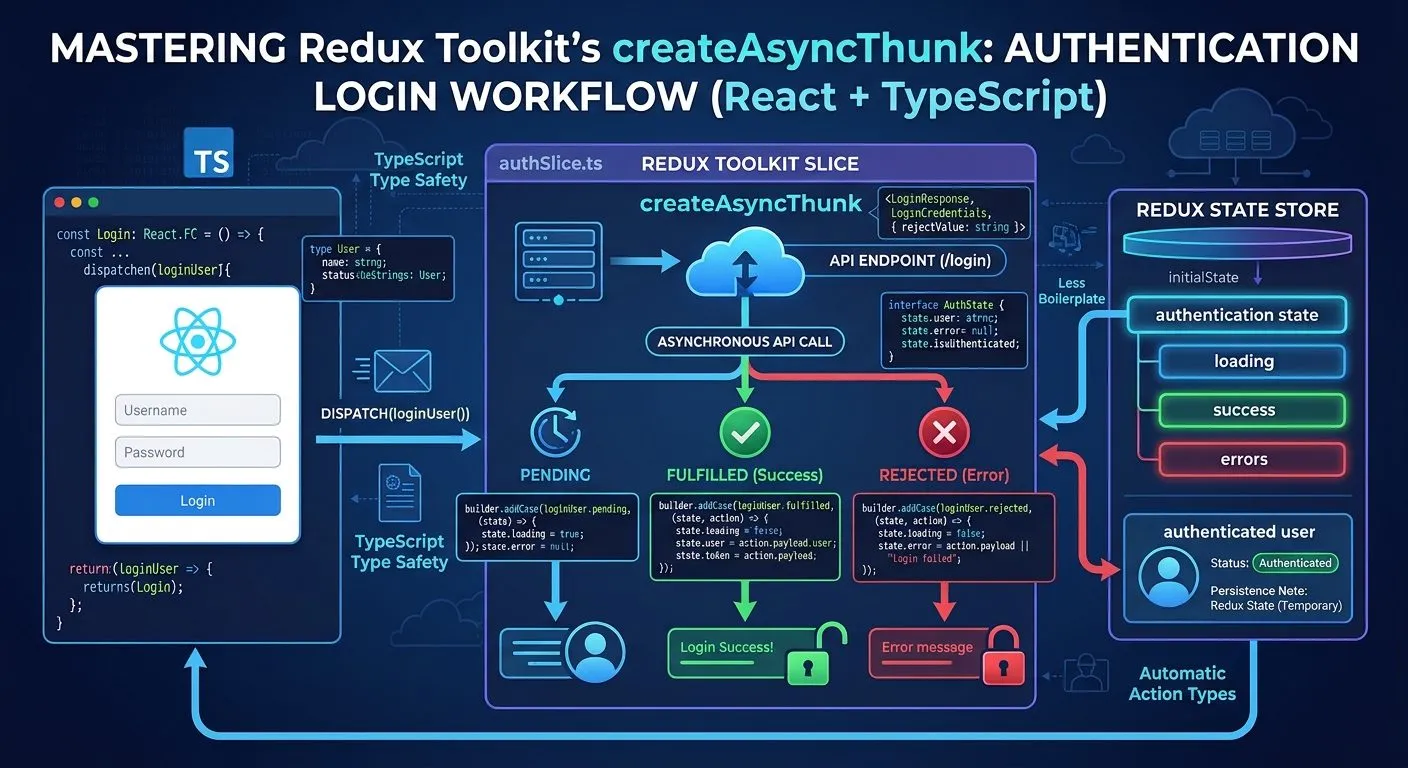
Redux Toolkit createAsyncThunk: Handling Login API Requests in React
A login request is a good example of where Redux Toolkit's createAsyncThunk becomes useful. The request takes time, can fail, and its result needs to be reflected across the application.
Instead of managing the API request and its loading and error states inside a component, we can move that logic into a Redux slice.
In this example, we'll build a login flow using React, TypeScript, Redux Toolkit, and createAsyncThunk.
Project setup
Install Redux Toolkit and React Redux:
npm install @reduxjs/toolkit react-reduxThe example uses a backend endpoint at /auth/login. It expects an email and password and returns the authenticated user's information. The backend should also set the authentication cookie in its response.
We'll keep the Redux code inside an auth feature:
src/
├── app/
│   ├── hooks.ts
│   └── store.ts
├── features/
│   └── auth/
│       └── authSlice.ts
├── components/
│   └── LoginForm.tsx
├── App.tsx
└── main.tsx
Create the login async thunk
Start with authSlice.ts.
The thunk is responsible for communicating with the backend. The slice handles what happens to the authentication state when the request starts, succeeds, or fails.
import { createAsyncThunk, createSlice } from "@reduxjs/toolkit";

interface LoginCredentials {
  email: string;
  password: string;
}

interface User {
  id: string;
  name: string;
  email: string;
}

interface LoginResponse {
  user: User;
}

interface AuthState {
  user: User | null;
  status: "idle" | "loading" | "authenticated" | "failed";
  error: string | null;
}

export const loginUser = createAsyncThunk<
  User,
  LoginCredentials,
  { rejectValue: string }
>(
  "auth/login",
  async (credentials, { rejectWithValue }) => {
    try {
      const response = await fetch(
        `${import.meta.env.VITE_API_URL}/auth/login`,
        {
          method: "POST",
          headers: {
            "Content-Type": "application/json",
          },
          credentials: "include",
          body: JSON.stringify(credentials),
        }
      );

      const data = (await response.json()) as LoginResponse & {
        message?: string;
      };

      if (!response.ok) {
        return rejectWithValue(
          data.message || "Invalid email or password."
        );
      }

      return data.user;
    } catch {
      return rejectWithValue(
        "Unable to connect to the server. Please try again."
      );
    }
  }
);

const initialState: AuthState = {
  user: null,
  status: "idle",
  error: null,
};

const authSlice = createSlice({
  name: "auth",
  initialState,
  reducers: {},
  extraReducers: (builder) => {
    builder
      .addCase(loginUser.pending, (state) => {
        state.status = "loading";
        state.error = null;
      })
      .addCase(loginUser.fulfilled, (state, action) => {
        state.status = "authenticated";
        state.user = action.payload;
      })
      .addCase(loginUser.rejected, (state, action) => {
        state.status = "failed";
        state.error =
          action.payload || "Something went wrong.";
      });
  },
});

export default authSlice.reducer;
There are two separate responsibilities here.
createAsyncThunk handles the asynchronous operation. It sends the credentials to the API and returns the user information when the request succeeds.
extraReducers handles the result of that operation. Redux Toolkit generates three action types for the thunk:
- ▸
loginUser.pendingruns when the request starts. - ▸
loginUser.fulfilledruns when the promise resolves successfully. - ▸
loginUser.rejectedruns when the promise fails or the thunk returnsrejectWithValue.
The rejectWithValue function is useful when the backend sends a meaningful error message. That message becomes available as action.payload in the rejected reducer.
The thunk's TypeScript generics describe the successful return value, the argument passed when dispatching it, and the custom rejection value:
createAsyncThunk<
  User,
  LoginCredentials,
  { rejectValue: string }
>
This means the thunk returns a User on success, accepts LoginCredentials, and can return a string as its custom error.
Configure the Redux store
Create store.ts inside the app directory:
import { configureStore } from "@reduxjs/toolkit";
import authReducer from "../features/auth/authSlice";

export const store = configureStore({
  reducer: {
    auth: authReducer,
  },
});

export type RootState = ReturnType<typeof store.getState>;
export type AppDispatch = typeof store.dispatch;
The auth key determines where the authentication state lives in the Redux store. Components can access it through state.auth.
We also export the inferred state and dispatch types so they can be reused throughout the application.
Create typed Redux hooks
Instead of repeatedly providing Redux types in components, create reusable typed hooks in hooks.ts:
import { useDispatch, useSelector } from "react-redux";
import type { RootState, AppDispatch } from "./store";

export const useAppDispatch = useDispatch.withTypes<AppDispatch>();

export const useAppSelector = useSelector.withTypes<RootState>();
This uses the .withTypes() API available in React Redux 9.1 and newer. It gives us typed versions of useDispatch and useSelector.
Connect the store to React
The Redux store needs to be provided to the component tree. Wrap the application with React Redux's Provider in main.tsx:
import React from "react";
import ReactDOM from "react-dom/client";
import { Provider } from "react-redux";
import { store } from "./app/store";
import App from "./App";

ReactDOM.createRoot(
  document.getElementById("root")!
).render(
  <React.StrictMode>
    <Provider store={store}>
      <App />
    </Provider>
  </React.StrictMode>
);
Once the Provider is in place, components can access the store using Redux hooks.
Dispatch the login request from a component
Now create LoginForm.tsx.
The component manages the email and password fields locally. Authentication data and request status come from Redux.
import { useState } from "react";
import type { FormEvent } from "react";

import { useAppDispatch, useAppSelector } from "../app/hooks";
import { loginUser } from "../features/auth/authSlice";

export default function LoginForm() {
  const dispatch = useAppDispatch();

  const { user, status, error } = useAppSelector(
    (state) => state.auth
  );

  const [email, setEmail] = useState("");
  const [password, setPassword] = useState("");

  const isLoading = status === "loading";

  const handleSubmit = (event: FormEvent<HTMLFormElement>) => {
    event.preventDefault();

    dispatch(
      loginUser({
        email,
        password,
      })
    );
  };

  if (user) {
    return (
      <div>
        <h2>Welcome, {user.name}</h2>
        <p>You are logged in.</p>
      </div>
    );
  }

  return (
    <form onSubmit={handleSubmit}>
      <h2>Login</h2>

      <input
        type="email"
        placeholder="Email address"
        value={email}
        onChange={(event) => setEmail(event.target.value)}
        required
        disabled={isLoading}
      />

      <input
        type="password"
        placeholder="Password"
        value={password}
        onChange={(event) => setPassword(event.target.value)}
        required
        disabled={isLoading}
      />

      <button type="submit" disabled={isLoading}>
        {isLoading ? "Logging in..." : "Login"}
      </button>

      {error && <p role="alert">{error}</p>}
    </form>
  );
}
The important part is the dispatch call:
dispatch(loginUser({ email, password }));This starts the thunk. The component doesn't need to manage the API request or manually update the Redux state.
When the request starts, status becomes "loading". When it succeeds, user is populated. When it fails, error contains the message returned by the thunk.
The component simply reads the updated state and renders the appropriate UI.
Render the form from App.tsx:
import LoginForm from "./components/LoginForm";

function App() {
  return <LoginForm />;
}

export default App;
Using the thunk result in a component
There is one useful detail about dispatching async thunks.
Dispatching a createAsyncThunk action returns a promise that resolves to the final action, whether the request succeeded or failed. It does not reject like a normal promise when the thunk fails.
When a component needs to perform something only after a successful login, such as navigating to a dashboard, use .unwrap():
try {
  const user = await dispatch(
    loginUser({ email, password })
  ).unwrap();

  console.log("Logged in:", user);

  // Navigate to the dashboard here.
} catch (error) {
  console.error("Login failed:", error);
}
With .unwrap(), a successful request returns the fulfilled payload. A rejected request throws the rejection value or error, which can be handled in catch.
A note about authentication security
This example uses credentials: "include" because the backend is expected to set an HttpOnly authentication cookie.
The browser handles that cookie automatically on subsequent requests, provided the backend and cookie settings allow it. For cross-origin requests, the backend must also configure CORS to allow credentials and specify the correct frontend origin.
An HttpOnly cookie cannot be read directly by frontend JavaScript. That is useful because Redux state and localStorage are accessible to JavaScript running on the page.
Also, the TypeScript assertion on the API response describes the expected response shape at compile time; it does not validate the server's JSON at runtime. Production applications should validate untrusted API responses where appropriate.
Conclusion
createAsyncThunk is useful when an API request affects state shared across multiple components. It keeps request logic outside the UI and gives the Redux slice a consistent place to handle loading, success, and failure.
The same pattern works for registration, password resets, profile updates, and data fetching. The important part is keeping the API operation in the thunk and letting the slice manage the resulting application state.